Everything you need to know about The REST API with Spring Boot + MySQL

Table of Content
- Introduction
- Prerequisite Knowledge
- Prerequisite Tools
- Scenario
- Environment Setup
- MVC Architecture Pattern
- Setting up the MySQL database connection
- How Spring Boot REST works
- Create Tables in MySQL
- Working with Services
- Dependency Injection
- Wiring the Spring Bean Objects
- CRUD Operations
- Error Handling
- Relationships among Entities
- Conclusion
Introduction
Alright, I know many of you know the Java. Right… It is the first language that you got learned when you were studied OOP concepts. So do I. Theses days lots of developers are interesting about REST full applications. Because It helps to deliver the JSON format data to Standalone single page front-end applications(React, Angular, Vue, etc.) and mobile applications(React native, flutter, etc) via HTTP verbs. So in this article, I will explain step by step how to build REST API with Spring Boot framework.
Prerequisite Knowledge
- Some background with Java and OOP concepts
- some background with Spring Boot framework (It is not mandatory)
- Basic Idea about HTTP verbs or method (CURD)
- some background about relational databases like MySQL
Prerequisite Tools
- JDK-8 version
- IntelliJ IDEA
- Postman
- XAMPP (MySQL)
Scenario
Here, I explain what we are going to build. we have members in Leo club. Right… They may have multiple addresses of their residences. So the JSON output is like this
member{
    "id": 23,
    "first name": "Jone",
    "last name": "Smith",
    "sex": "Male",
    "age": 24,
    "adress": [
        {
         "id": 1,
         "street": "123/D, Street_name1",
         "city": "city_name1"
         },
         {
         "id": 2,
         "street": "456/D, Street_name2",
         "city": "city_name2"
         }
    ]
}
So we create REST API that is cable of handling the CRUD functionalities which are Creating a new member, Retrieve an existing member or members, Update an existing member and finally Delete an existing member.
Environment Setup
So this article I use IntelliJ IDE to create the REST application. The IDE is up to you guys 😌. I used maven dependency management tool for the Spring Boot application. So the first thing first, just go to Spring initializer web site to generate the boilerplate for this project.

Here I added 3 dependencies. They are web, JPA and MySQL diver. I use JDK 8 version. If you are interested in JDK 11, just select it. Finally, I change project metadata as I want. And click the generate button. After doing so, extract the compressed file that you were downloaded, and open with it in IntelliJ. Make sure your internet connection is on and it takes some time to download your dependency.
MVC Architecture Pattern
This is a very common architecture pattern today. So it has mainly 3 logical components. They are Model, View and Controller. So the model is handling the data-related logic. That means we code the relevant database objects and their responsibilities in this logical component. The View is just UI stuff, here we don’t worry about it. We use Postman as our view. And finally, Controller basically handles the requests. In addition to that, we create one logical component which is the service component. This thing enables us to do the CRUD functionalities with the MySQL. So create 3 layers in IntelliJ. That are Model, Controller and Service layers.

Setting up the MySQL database connection
I am using the XAMPP open-source package as the MySQL server. It doesn't really matter what kind of you package you used for running MySQL server. I created a new database name “leodb” in my Mysql server and I add some properties to application.properties file to configure the database connection with leodb.
spring.jpa.hibernate.ddl-auto=updatespring.datasource.url=jdbc:mysql://localhost:3306/leodb?useUnicode=true&useJDBCCompliantTimezoneShift=true&useLegacyDatetimeCode=false&serverTimezone=UTCspring.datasource.username=root

spring.datasource.driver-class-name=com.mysql.cj.jdbc.Driverspring.jpa.properties.hibernate.dialect=org.hibernate.dialect.MySQL5Dialectspring.jpa.show-sql=true
The application.properties file is located

Remember I created these properties for my environment. Your environment can be a little different right. I will tell some hint to adjust them.
spring.jpa.hibernate.ddl-auto=update spring.datasource.driver-class-name=com.mysql.cj.jdbc.Driverspring.jpa.properties.hibernate.dialect=org.hibernate.dialect.MySQL5Dialectspring.jpa.show-sql=true
These above configurations are fine, just add them. Only you need to change the following things
spring.datasource.url=jdbc:mysql://localhost:3306/leodb?useUnicode=true&useJDBCCompliantTimezoneShift=true&useLegacyDatetimeCode=false&serverTimezone=UTCThis representation the URL for your DB connection. The Default port for MySQL is 3306. So If you are running with a different port, just replace it. And it followed by the database name that you created. In this case, I created leoddb as my database name. If you created with a different name, just replace it. New JDBC driver to work with UTC time zone. So we have to explicitly specify the serverTimezone of the connection string. That is why these parameters came in to play. Time zone issues.
spring.datasource.username=root
#spring.datasource.password=<your password>
Using this property you can change that MySQL server username and the password. In my case, I am using default username(root) and password(no password).
When you are dealing with MySQL server with XAMPP, you need to run Apache server also. It is where the PHPMyAdmin web page run. I used PHPMyAdmin to create my database. So the problem is if you running apache on port 8080 then Tomcat server of Spring Boot application cannot be run. Because its default port is 8080. You need to change that default port in the application.properties file
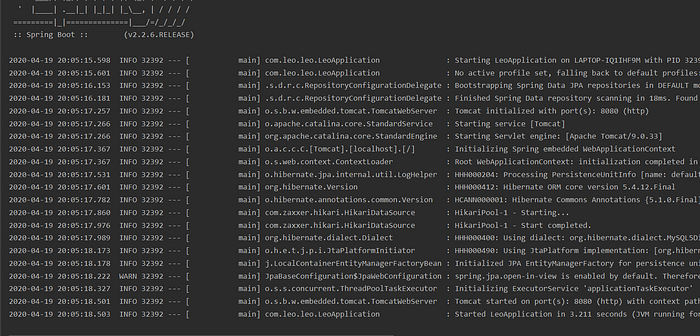
server.port=<some closed port> # eg:- 8090I think I clearly mentioned everything up here. It is time to run your Spring Boot Application. If everything works fine, you now get running window like below 😍
How Spring Boot REST works
Alright, now time to see the basic example of how REST works. So I am creating the Member model and just use GET HTTP verb to get the JSON data to the postman through Controller. And see what happened.
- Create a Member class in the model package
package com.leo.leo.model;

public class Member {
    private int id;
    private  String firstName;
    private String lastName;
    private String sex;
    private int age;

    public Member(String firstName, String lastName, String sex, int age) {
        this.firstName = firstName;
        this.lastName = lastName;
        this.sex = sex;
        this.age = age;
    }

    public int getId() {
        return id;
    }

    public void setId(int id) {
        this.id = id;
    }

    public String getFirstName() {
        return firstName;
    }

    public void setFirstName(String firstName) {
        this.firstName = firstName;
    }

    public String getLastName() {
        return lastName;
    }

    public void setLastName(String lastName) {
        this.lastName = lastName;
    }

    public String getSex() {
        return sex;
    }

    public void setSex(String sex) {
        this.sex = sex;
    }

    public int getAge() {
        return age;
    }

    public void setAge(int age) {
        this.age = age;
    }
}
2. Create the MemberController class in the controller
package com.leo.leo.controller;


@Controller
public class MemberController {

    @GetMapping("/member")
    @ResponseStatus(HttpStatus.OK)
    @ResponseBody
    public Member getMember(){
        return new Member("Jone", "Smith", "Male",24);
    }
}
When you look at the Member class, It just a POJO class as usual with constructor and setter and getter methods. So you don’t confuse with it. But when you are looking MemberController class, there is something denote that with @ symbol. Alright, what that heck is that??? 🤔 Do not worry about it. It just Stereotypes annotations which represent the role of some class, method or variable.
Using @Controller we can say MemberController class is control class. It is a place where all the requests are handled. @GetMapping(“/member”) represents the getMember() method handling the GET requests with URL “/member”. And @ResponseStatus(HttpStatus.OK) tells the getMember() method response status is 200 OK. Finally, @ResponseBody serialize the Java object that is being sent(Member(“Jone”, “Smith”, “Male”,24)). What I mean by serialization is converting the Java object to JSON object.
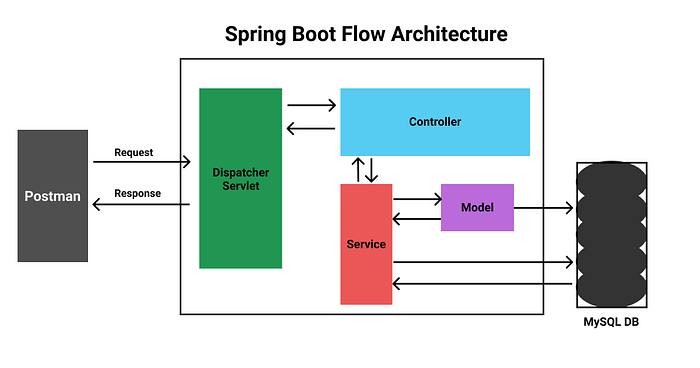
Dispatcher Servlet is responsible for serialization and deserialization. The above diagram illustrates how logical components interact with others.
So run the program and open the postman for sending the GET request to your REST API. Remember you need to MySQL server is running on otherwise it gets errors.
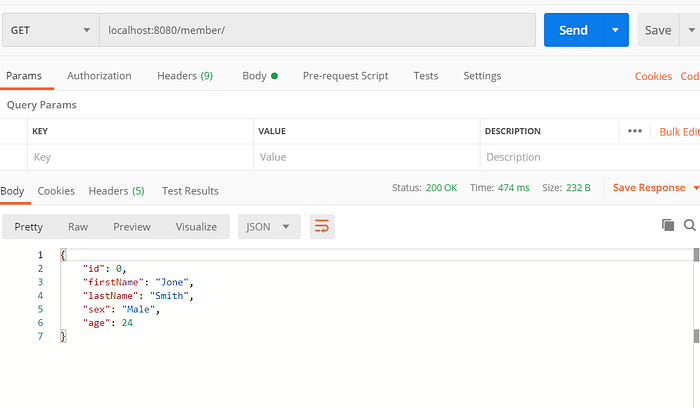
Cool right 😍 it just very easy. Our Member Class is Serialized by having a bunch of annotations. So Instead of @Controller, we use @RestController annotation because of we building the REST application.
package com.leo.leo.controller;


@RestController
public class MemberController {

    @GetMapping("/member")
    @ResponseStatus(HttpStatus.OK)
    public Member getMember(){
        return new Member("Jone", "Smith", "Male",24);
    }
}
So when we use @RestController annotation we do not need to annotate the method with @ResponseBody. Because @RestController is equivalent to @Controller + @ResponseBody. Therefore it has this feature. Let’s reduce our code further by making it ResponseEntity.
package com.leo.leo.controller;


@RestController
public class MemberController {

    @GetMapping("/member")
    public ResponseEntity<Member> getMember(){
        return new ResponseEntity(new Member("Jone", "Smith",          "Male",24),HttpStatus.OK);
    }
}
Here we remove the @ResponseStatus(HttpStatus.OK) and attached with it the ResponseEntity class. So what is the ResponseEntity??? ResponseEntity is meant to represent the entire HTTP response. You can control anything that goes into it: status code, headers, and body. Awesome right 😛😛😛. It is now time to interact with the database.
Create Tables in MySQL
So let’s again deep dive into what we have written in the application.properties file.
spring.jpa.hibernate.ddl-auto=updateJPA allows us to access and persist data between Java object and relational database in my case Member object and MySQL. So the tool JPA is used to ORM is ‘hibernate ORM’ tool. In here we said that hibernate DDL auto-update. That means automatically create the tables based on the entity classes in the application. But we do not have an entity class through. So make some class to entity class then we use @Entity annotation. 😁 That makes sense. So then hibernate is able to create a table out of @Entity annotation class. Now we know why we need hibernate tool. And we have another property of JPA
spring.jpa.properties.hibernate.dialect=org.hibernate.dialect.MySQL5DialectAlthough Hibernate is database agnostic, we can specify the current database dialect to let it generate better SQL queries for that database. In my case, I tell to MySQL5Dialect to create MySQL queries when I am trying to do CRUD methods.
Now time to decorate the Member class with some annotations and do the ORM stuff.
package com.leo.leo.model;


@Entity
public class Member {
    @Id
    @GeneratedValue(strategy = GenerationType.IDENTITY)
    private int id;
    private  String firstName;
    private String lastName;
    private String sex;
    private int age;

    public int getId() {
        return id;
    }

    public void setId(int id) {
        this.id = id;
    }

    public String getFirstName() {
        return firstName;
    }

    public void setFirstName(String firstName) {
        this.firstName = firstName;
    }

    public String getLastName() {
        return lastName;
    }

    public void setLastName(String lastName) {
        this.lastName = lastName;
    }

    public String getSex() {
        return sex;
    }

    public void setSex(String sex) {
        this.sex = sex;
    }

    public int getAge() {
        return age;
    }

    public void setAge(int age) {
        this.age = age;
    }
}
Alright then, by adding @Entity annotation to some class then the hibernate create the table of that class in the database. The default name of the table is “member”. If you want to change the name of the table then you have to add another annotation called @Table(name = "SOME NAME") to the Member class. I am going with defaults. I add some annotations to fields also. These fields represent the fields(columns) of the table.
- @Id tells that field is the primary key
- @GeneratedValue(strategy = GenerationType.IDENTITY) tells that that filed is AI(Auto increment)
- @Column(name = “SOME COLUMN NAME”) tells that change the column name. I prefer with defaults
Now re-run the application and check your database. If everything fines then you have a table in leodb database
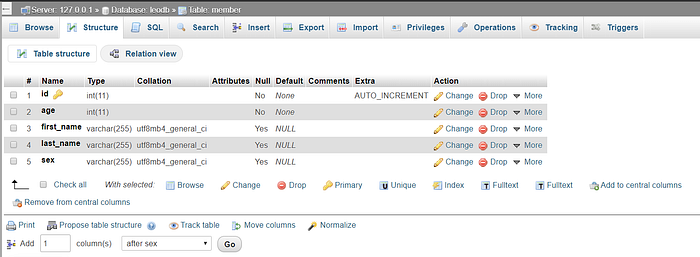
Awesome right 😍 We actually do nothing but Spring Boot take care about everything. Our Only task is to provide annotations at the right place. And this will eventually work.
Working with Services
Congratulations 🤩 You have done lots of things and you have now some understanding of what is going on here. I am trying to aware of you with every little detail. It is worth to learn, trust me.
Before going further, just go and look again how Spring Boot flow architecture works. There you can see Server component has the ability to directly interact with the MySQL database. So this the where the CRUD functions have happened. Do so, we use the CrudRepository interface. It has the capability to do the CRUD operations with MySQL database. Therefore we create the MemberServer interface with extends the CrudRepository inside the service package. Once we extend, then we have CRUD functions.
package com.leo.leo.service;


import com.leo.leo.model.Member;
import org.springframework.data.repository.CrudRepository;
import org.springframework.stereotype.Service;

@Service
public interface MemberService extends CrudRepository<Member, Integer> { }
Actually we do not implement much code in MemberService interface. we just extend CrudRepository (more). And mark this interface at @Service annotation. When I first saw this, I have a question. Do I really need to implement the method signatures in the CrudRepository such as save, delete, findAll??? 🙄 Not actually, Spring will take care of it. What I mean by that Spring will automatically create its implementation class at runtime 😍. This is the beauty of this framework. I know, you guys may have a question like can we write our own queries ??? 🤔 Of course, you can do it. I will explain it later.
Dependency Injection
Well well well…It is time to know another technique that Spring frequency used. Which is called Dependency Injection. As we know, the singleton design pattern used in Sprint Beans as the default design pattern. Singleton says that I am guaranteed of being created a single instance. So I am telling the Spring that you really need to take care of it. I am not worried about instantiating the instance. You need to instantiate in your spring container as Spring beans and give it to me when I need it. Alright, Let’s look at how spring handles these kinds of situation.
So first, when you run the Spring application, It is looking for the @Component annotated objects and make them as Spring bean object and initialized those bean objects in spring IoC container. So those beans are managed by the Spring IoC container. Spring IoC container is the central management system of the Spring Framework. It is responsible to create, configure and manage the life cycle of these bean objects. So we don’t worry about to creat them. Just add the @Component annotation to the class which you want as Spring bean object. Awesome right 🤩
Now the question is, we don’t have any class that is annotated by @Component. or do we ??? Yes, actually we do 😶

Look at the above diagram. @Controller, @Service, and @RestController are inherited from the @Component annotation. So actually we have a component class. They are MemberService(@Service) and MemberController(@Controller) classes. Since they are now Spring beans, we do not have to worry about their instance initialization. I know still, I did not tell what the heck is the dependency Injection. pardon me 😌. So sometimes some Spring bean object can be depended on another Spring bean object. Then we have to inject that dependency to tell the spring that gives the instance of my dependency object.
note:- Dependency Injection is a kind of mapping(wiring) among Spring Bean objects. This help to loose coupling among classes. So when you used @Component based annotations. It means that the Spring framework will autodetect these classes for dependency injection when annotation-based configuration and classpath scanning is used.
Wiring the Spring Bean Objects
Back to the happy path again. So now you know the beauty of the Spring Boot framework and what the dependency injection is. We need MemberService to access the database. MemberController is handling the request. So when we are doing a POST request then we have the post mapping in MemberController class and also need to insert the Member object that comes from the POST request.
So we need MemberService object(to do the CRUD operations) inside of the MemberController class. So MemberController class is now dependent on the MemberService class. Then we need to do the dependency injection on MemberService class. So we are telling the spring by annotating @Autowired.
package com.leo.leo.controller;

import com.leo.leo.model.Member;
import com.leo.leo.service.MemberService;
import org.springframework.beans.factory.annotation.Autowired;
import org.springframework.http.HttpStatus;
import org.springframework.http.ResponseEntity;
import org.springframework.web.bind.annotation.GetMapping;
import org.springframework.web.bind.annotation.RestController;

@RestController
public class MemberController {

    @Autowired
    private MemberService memberService;

    @GetMapping("/member")
    public ResponseEntity<Member> getMember(){
        return new ResponseEntity(new Member("Jone", "Smith",     "Male",24),HttpStatus.OK);
    }
}
CRUD Operations
Now we have access to the MySQL database. This is time for creating CRUD operation in MemberController class.
Alright now go to the PHPMyAdmin page and select the leodb and insert some values to it. This what I am inserted.

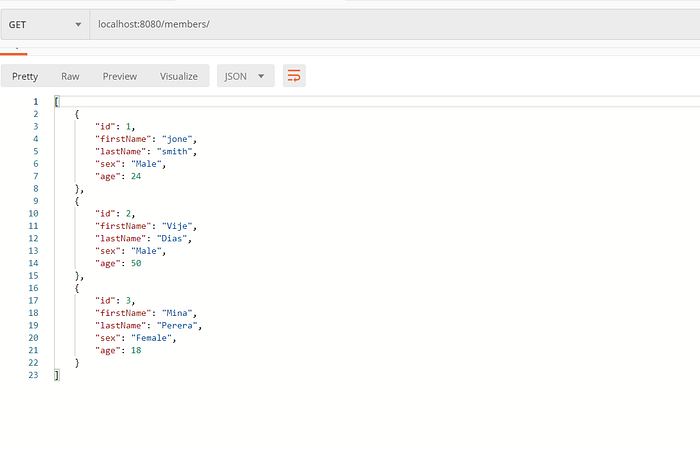
Get all the data inside the database(Retrieve)
@GetMapping("/members")
Iterable<Member> getAllMember(){
    return memberService.findAll();
}
we are returning the collection the Members and findAll() method will do that. Also, this can be written with a ResponseEntity class that I mentioned very beginning. The similar code is
@GetMapping("/members")
ResponseEntity<Iterable<Member>> getAllMember(){
    return  new ResponseEntity(memberService.findAll(), HttpStatus.OK);
}
The Output:

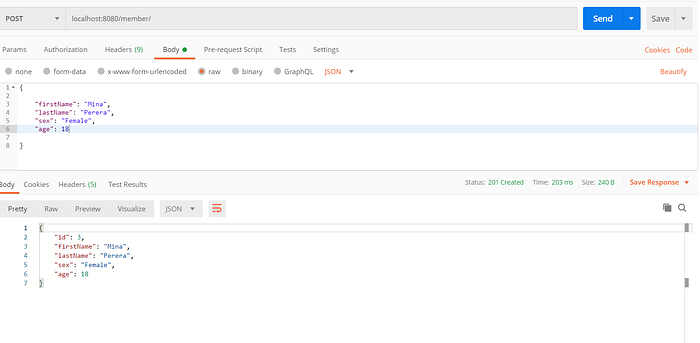
Insert Member object to the database (Create)
@PostMapping("/member")
ResponseEntity<Member> saveMember(@RequestBody Member member){
    Member saveMember = memberService.save(member);
    return new ResponseEntity(saveMember, HttpStatus.CREATED);
}
Here you can see an annotation which set to the saveMember() method args. we are sending Member object using postman. So that object comes within the request body. But this @RequestBody means that whatever the object in the request body, just deserialized (convert JSON object to Java object). I know, I know, 😋 It just likes @ResponseBody(but it does the opposite thing). Who does that ??? 😏 Now you know the answer right. 🤗 If you are really forgotten. Just read here.
The Output:
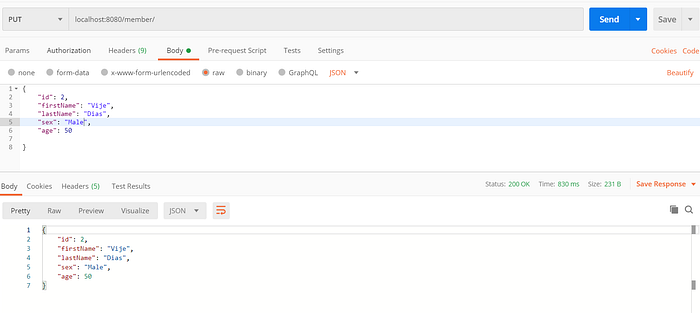
Update the Member in the database (Update)
@PutMapping("/member")
ResponseEntity<Member> updateMember(@RequestBody Member member){
    Member updateMember = memberService.save(member);
    return new ResponseEntity(updateMember, HttpStatus.OK);
}
Alright, this is more similar like @PostMapping method. But for the update, we need to specify the Member Id. But @PostMapping method we did not do that because Member Id(primary key) is auto-incremented. So I update Member Id 2 with the name “Vije dias” and age with “50”. So the previously it as Adam Smith Member object.
The output:
With GET request
Delete the Member In the database (Delete)
@ResponseStatus(HttpStatus.NO_CONTENT)
@DeleteMapping("/member/{id}")
void deleteMember(@PathVariable Integer id){
    memberService.deleteById(id);
}
So @DeleteMapping method returns nothing. Therefore we set to response status as 204 (No Content). If you do not provide @ResponseStatus, then the default status will 200(OK). Another thing that we use id path variable. Behind the scene, @PathVariable does the deserialization.
For example:
localhost:8080/member/1The above URL 1 is id. Right… So it converts to the Java data type like
1 → Integer id =1
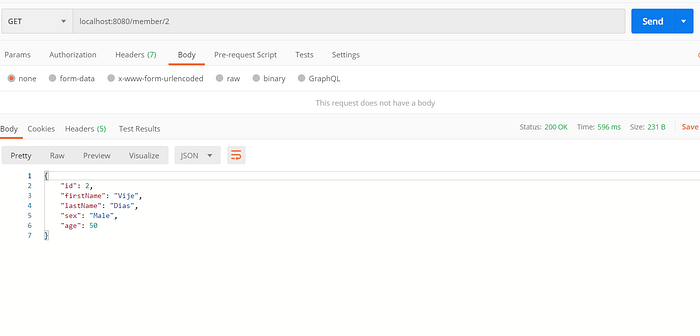
Retrieve the Members by Id
@GetMapping("/member/{id}")
ResponseEntity<Optional<Member>> getMemberById(@PathVariable Integer id){
    final Optional<Member> byId = memberService.findById(id);
    return new ResponseEntity(byId, HttpStatus.OK);
}
Here again, we used path variable id to retrieve the corresponding Member object from the database. findById() method return the Optional<T> data type and that’s why we return ResponseEntity with that data type.
The output:
I know you guys are learnt lots of stuff here. I am pretty sure about it. But we have more things to go like how to handle errors, how to validate incoming JSON objects, etc. Step by step we are going further until we build complete REST API. 🤗
Error Handling
So far so good 😎 But sometimes you have to handle the exception as well. In this section, I will explain how easily handle the exception that occurs in the program. Suppose you need to update(PUT) only the Member objects that were in the database. Otherwise, an object has been created(POST). So for that, when the PUT request comes in, we need to check whether that member id is already in the database. Then we have to update.
Let’s see how to handle this kind of situation. So first I create the util package to have my ErrorMeaage class. It only has the error message and the status (mostly 400)
package com.leo.leo.util;

public class ErrorMessage {
    private String errorMsg;
    private  String status;

    public ErrorMessage(String errorMsg, String status) {
        this.errorMsg = errorMsg;
        this.status = status;
    }

    public String getErrorMsg() {
        return errorMsg;
    }

    public void setErrorMsg(String errorMsg) {
        this.errorMsg = errorMsg;
    }

    public String getStatus() {
        return status;
    }

    public void setStatus(String status) {
        this.status = status;
    }
}
We know the update scenario (by checking the member id in the database). What are we don’t have that it??? 🙄 Then we have thrown the ValidationException. That exception doesn’t sound like JSON output… Right😣. We need to have an output that says “You Member id is not available, you are not able to update it” with the status of BAD_REQUEST(400).
When we throw the exception, there needs to be a mechanism to catch that exception. Then in the catch block, we can return the ResponseEntity with that message. Spring provides us with an awesome strategy for that. Once we annotated some class with the @ControllerAdvice, all the thrown exceptions are headed to this class. we can think this is some kind of exception handling class. Inside this class, we annotated methods with @ExceptionHandler(<Exception data type>) and tell how to handle this specific Exception.
Modifying our PutMapping in MemberController class:
@PutMapping("/member")
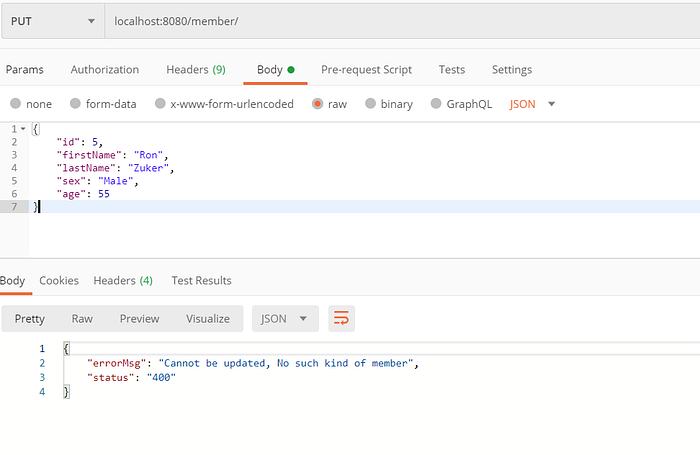
ResponseEntity<Member> updateMember(@RequestBody Member member) throws ValidationException {
if(memberService.findById(member.getId()).isPresent()){
Member updateMember = memberService.save(member);
return new ResponseEntity(updateMember, HttpStatus.OK);
}else
throw new ValidationException("Cannot be updated, No such kind of member");
}So here you can see if we have an Id then we update like previously otherwise we throw ValidationException. As we know all the exceptions are now headed to the @ControllerAdvice class and handled the method that is annotated by @ExceptionHandler(ValidationException.class).
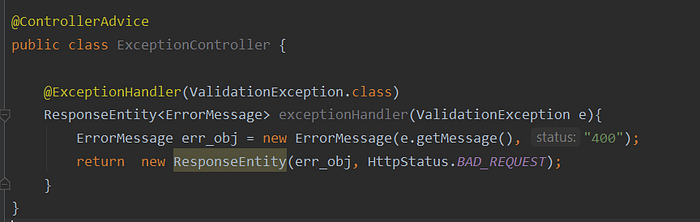
I create the ExceptionController class inside the Controller package.
@ControllerAdvice
public class ExceptionController {

    @ExceptionHandler(ValidationException.class)
    ResponseEntity<ErrorMessage> exceptionHandler(ValidationException e){
        ErrorMessage err_obj = new ErrorMessage(e.getMessage(), "400");
        return  new ResponseEntity(err_obj, HttpStatus.BAD_REQUEST);
    }
}
since this is little unclear look the image:
Now you have an idea about what is going on here. we take the thrown exceptional message and attach to the ErrorMessage object and return the ErrorMessage ResponseEntity.😋
The Output:
JSON data validations
Suppose that your first name, sex and age need to be required. If you are not providing those things before saved then the error occurs. I know what you think…😌 it is easy right… you all have to do get each field (first name, sex, age) and check whether if they are blank or not. If they all not blank, then save the data else throw ValidationException…
But we don’t have to do this. Because we are dealing with an awesome framework. Right…
Here are some basic validations that you annotate with fields of Entity class. For more details Here
@NotNull a constrained CharSequence, Collection, Map, or Array is valid as long as it's not null, but it can be empty.
@AssertTrue check if the boolean value is true
@Min check the min value of a number
@Max check the max value of a number
@Size check the length of string or collection
@Digit check if represent the number
@Pattern regular expression
@NotEmpty a constrained CharSequence, Collection, Map, or Array is valid as long as it's not null and its size/length is greater than zero
@NotBlank a constrained String is valid as long as it's not null and the trimmed length is greater than zero
@Postive check number is positive
@Negative check number is positive
@PostiveOrZero check number is positive including 0
@NegativeOrZero check number is negative including 0
@Email check if email is valid
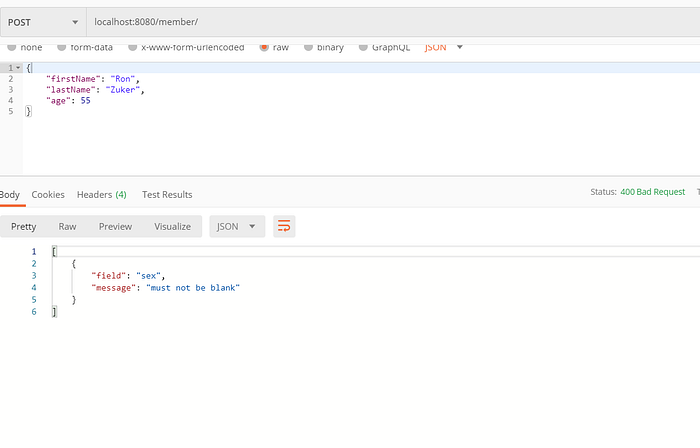
@Past check if data is in the pastSo we can annotate our Member class’s fields. So in this case, the first name, sex and age are required. Then we apply @NotBlank annotation to those fields.
@Entity
public class Member {
    @Id
    @GeneratedValue(strategy = GenerationType.IDENTITY)
    private int id;
    @NotBlank
    private  String firstName;
    private String lastName;
    @NotBlank
    private String sex;
    @NotBlank
    private int age;

    public int getId() {
        return id;
    }

    public void setId(int id) {
        this.id = id;
    }

    public String getFirstName() {
        return firstName;
    }

    public void setFirstName(String firstName) {
        this.firstName = firstName;
    }

    public String getLastName() {
        return lastName;
    }

    public void setLastName(String lastName) {
        this.lastName = lastName;
    }

    public String getSex() {
        return sex;
    }

    public void setSex(String sex) {
        this.sex = sex;
    }

    public int getAge() {
        return age;
    }

    public void setAge(int age) {
        this.age = age;
    }
}
So at the controller, we need to say take an only valid request body or otherwise throw an exception. So we can say this by adding @Valid annotation to the request body. Eventually, this annotation throws the MethodArgumentNotValidException if the request body is not valid. 🥰 So all we have to do now define the method to handle the MethodArgumentNotValidException in the @ControllerAdvice class(ExceptionController).
Here is the updated version of MemberController class:
@RestController
public class MemberController {

    @Autowired
    private MemberService memberService;


    @GetMapping("/members")
    ResponseEntity<Iterable<Member>> getAllMember(){
        return  new ResponseEntity(memberService.findAll(), HttpStatus.OK);
    }

    @PostMapping("/member")
    ResponseEntity<Member> saveMember(@Valid @RequestBody Member member){
        Member saveMember = memberService.save(member);
        return new ResponseEntity(saveMember, HttpStatus.CREATED);
    }

    @PutMapping("/member")
    ResponseEntity<Member> updateMember(@Valid @RequestBody Member member) throws ValidationException {
        if(memberService.findById(member.getId()).isPresent()){
            Member updateMember = memberService.save(member);
            return new ResponseEntity(updateMember, HttpStatus.OK);
        }else
            throw new ValidationException("Cannot be updated, No such kind of member");
    }

    @ResponseStatus(HttpStatus.NO_CONTENT)
    @DeleteMapping("/member/{id}")
    void deleteMember(@PathVariable Integer id){
        memberService.deleteById(id);
    }

    @GetMapping("/member/{id}")
    ResponseEntity<Optional<Member>> getMemberById(@PathVariable Integer id){
        final Optional<Member> byId = memberService.findById(id);
        return new ResponseEntity(byId, HttpStatus.OK);
    }


}
Let’s see how to define @ExceptionHandler(MethodArgumentNotValidException.class) method in @ControllerAdvice class.
@ExceptionHandler(MethodArgumentNotValidException.class)
ResponseEntity<Stream<FieldErrorMessage>> exceptionHandler(MethodArgumentNotValidException e){
    List<FieldError> fieldErrors = e.getBindingResult().getFieldErrors();
    Stream<FieldErrorMessage> fieldErrorMessageStream = fieldErrors.stream().map(fieldError ->
            new FieldErrorMessage(fieldError.getField(), fieldError.getDefaultMessage()));
    return  new ResponseEntity(fieldErrorMessageStream, HttpStatus.BAD_REQUEST);
}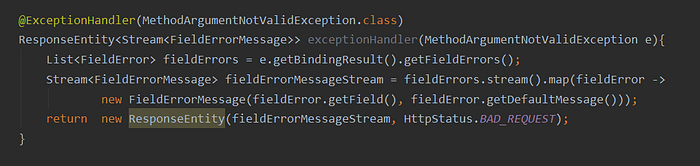
So let’s figure out what this method does. First, get the fields errors of MethodArgumentNotValidException thrown by @Valid annotation. Then we map each field error with our FieldErrorMessage class that we created(I created in the util package with 2 fields named “fields” and “message” ). I will put that code snippet below. Finally, we return the ResponseEntity with a set of FieldErrorMessage streams.
The FieldErrorMessage class(inside the util package):
public class FieldErrorMessage {
    private String field;
    private String message;

    public FieldErrorMessage(String field, String message) {
        this.field = field;
        this.message = message;
    }

    public String getField() {
        return field;
    }

    public void setField(String field) {
        this.field = field;
    }

    public String getMessage() {
        return message;
    }

    public void setMessage(String message) {
        this.message = message;
    }
}
The output:
Relationships among Entities
I think you have now a clear picture of Spring Boot framework. When you are creating a database diagram, you may have seen the relationships like one-to-one, one-to-many, many-to-many. So this is time to get known how to apply those kinds of relationships in Spring Boot. Just look at here. Here you can see one member can have many addresses. It is a one-to-many relationship. Right… Before creating a one-to-many relationship, we are going to build a one-to-one relationship. That means one member has one address. Therefore we use the Adress object as an embeddable object. Since Address is an embeddable object, we don’t have to specify the Address id. Here is the address class that created in the model package.
package com.leo.leo.model;@Embeddable
public class Address {
    private String street;
    private String city;

    public String getStreet() {
        return street;
    }

    public void setStreet(String street) {
        this.street = street;
    }

    public String getCity() {
        return city;
    }

    public void setCity(String city) {
        this.city = city;
    }
}
we are going to eventually embed this class to Member class. Therefore this class annotated with @Embeddable class. Now let’s look at the modified Member class
package com.leo.leo.model;@Entity
public class Member {
    @Id
    @GeneratedValue(strategy = GenerationType.IDENTITY)
    private int id;
    @NotBlank
    private  String firstName;
    private String lastName;
    @NotBlank
    private String sex;
    @NotNull
    private int age;

    @Embedded
    private Address address;

    public Address getAddress() {
        return address;
    }

    public void setAddress(Address address) {
        this.address = address;
    }

    public int getId() {
        return id;
    }

    public void setId(int id) {
        this.id = id;
    }

    public String getFirstName() {
        return firstName;
    }

    public void setFirstName(String firstName) {
        this.firstName = firstName;
    }

    public String getLastName() {
        return lastName;
    }

    public void setLastName(String lastName) {
        this.lastName = lastName;
    }

    public String getSex() {
        return sex;
    }

    public void setSex(String sex) {
        this.sex = sex;
    }

    public int getAge() {
        return age;
    }

    public void setAge(int age) {
        this.age = age;
    }
}
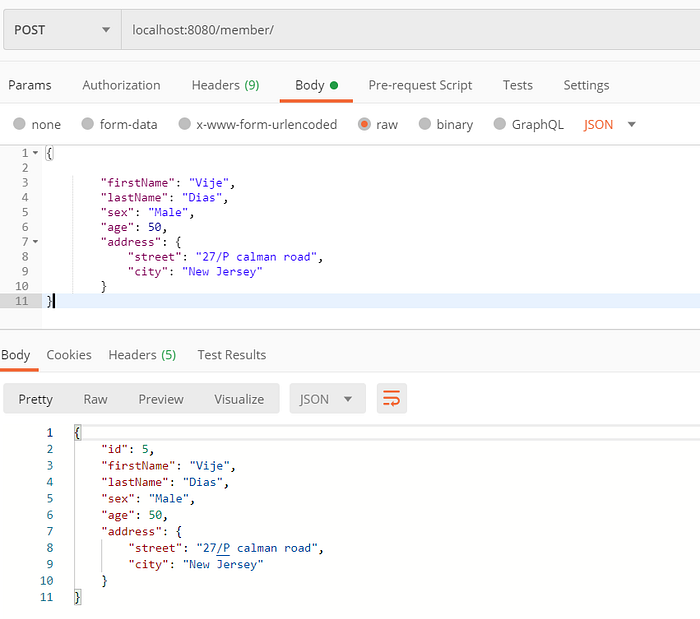
Here we take the embeddable Address object to the parent class(Member) and annotated with @Embedded. This means that merge the embeddable entity to the parent entity and treated the same as if they were declared there all the time. If you want to do the total participation. That means every member need an address. Then annotated this field with @NotNull validation 😉.
The output:
Alright, now we define a one-to-many relationship. In this case, one member can have at least one address. So this is no longer an embeddable object. This needs to be Entity with Address id as the primary key. Right… so we make Address class as an entity
package com.leo.leo.model;


@Entity
public class Address {
    @Id
    @GeneratedValue(strategy = GenerationType.IDENTITY)
    private int id;
    private String street;
    private String city;

    @JsonBackReference
    @ManyToOne
    private Member member;

    public int getId() {
        return id;
    }

    public void setId(int id) {
        this.id = id;
    }

    public Member getMember() {
        return member;
    }

    public void setMember(Member member) {
        this.member = member;
    }

    public String getStreet() {
        return street;
    }

    public void setStreet(String street) {
        this.street = street;
    }

    public String getCity() {
        return city;
    }

    public void setCity(String city) {
        this.city = city;
    }
}
Another thing that you noticed above is we added some king of back reference to the Address objects. @JsonBackReference used in child-parent relationships. @ManyToOne says there are at least one addresses(child) have for one member(parent).
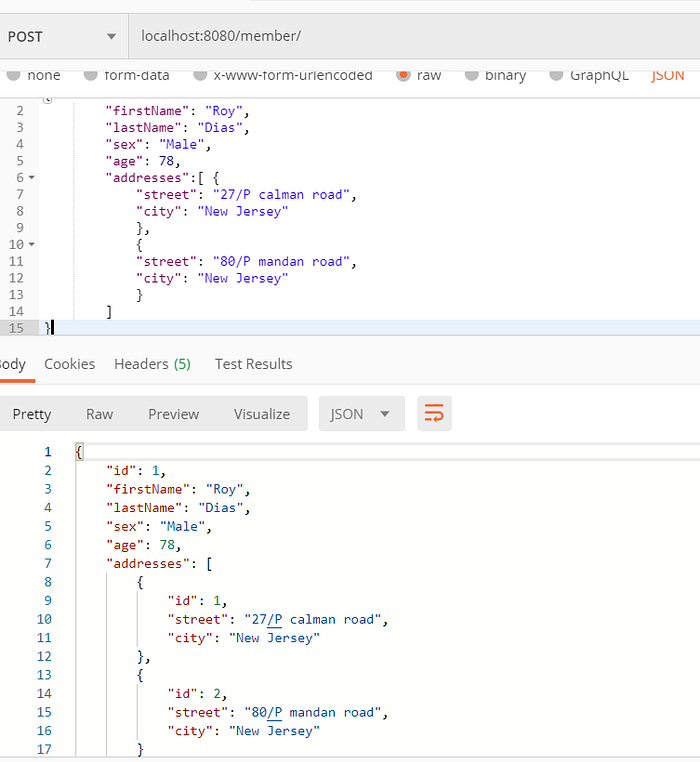
Since we need many addresses per member, we create a list of addresses in member class and annotated with @OneToMany JSON mapping annotation.
package com.leo.leo.model;

import com.fasterxml.jackson.annotation.JsonManagedReference;

import javax.persistence.*;
import javax.validation.constraints.NotBlank;
import javax.validation.constraints.NotNull;
import javax.validation.constraints.Positive;
import java.util.List;

@Entity
public class Member {
    @Id
    @GeneratedValue(strategy = GenerationType.IDENTITY)
    private int id;
    @NotBlank
    private  String firstName;
    private String lastName;
    @NotBlank
    private String sex;
    @NotNull
    private int age;

    @JsonManagedReference()
    @OneToMany(cascade = CascadeType.ALL, mappedBy = "member",
            orphanRemoval = true)
    private List<Address> addresses;


    public List<Address> getAddresses() {
        return addresses;
    }

    public void setAddresses(List<Address> addresses) {
        this.addresses = addresses;
    }

    public int getId() {
        return id;
    }

    public void setId(int id) {
        this.id = id;
    }

    public String getFirstName() {
        return firstName;
    }

    public void setFirstName(String firstName) {
        this.firstName = firstName;
    }

    public String getLastName() {
        return lastName;
    }

    public void setLastName(String lastName) {
        this.lastName = lastName;
    }

    public String getSex() {
        return sex;
    }

    public void setSex(String sex) {
        this.sex = sex;
    }

    public int getAge() {
        return age;
    }

    public void setAge(int age) {
        this.age = age;
    }
}
@JsonManagedReference() used for parent-child relationships. And @OneToMany relationship we define cascade type is all. Means that the persistence will propagate (cascade) all operations (PERSIST, REMOVE, REFRESH, MERGE, DETACH) to the relating entities. orphan removal means that no child can exit without their parent. Finally, we map the address object with the Member object as one-to-many.
The output:
👏👏👏 well done guys. Now you know almost everything except few. 😉 I am trying to explain everything with my best by step by step. Hope you guys enjoy by reading it.
Conclusion
The first thing that I need to mention that When you are creating Entity class, use the default constructor and getter and setter method of all fields. In this article, I did not explain how to write your own queries. Forgive me 😔. But I will explain it with a different article. You can count on me 😛 The source code is available is here in Git hub. So if you have any question, You are free to ask in the comment section.
